Create a Faux Sun-Kissed Glow
Hey guys, it’s Keira here! If you’re anything like me, you know the struggle of feeling super pale, especially in the winter months. I get so fair that I almost look ghostly—yikes, right? But don’t worry, I’ve got a simple, effective way to fake a bronzed, sun-kissed glow, all without stepping foot in the sun. If you’re craving a warm, radiant look but aren’t quite there yet in terms of tan, this makeup routine will get you glowing in no time. Let's dive right in!
Step 1: Prepping for a Subtle Glow
The first thing I do is prep my skin with a little bit of self-tanner. I don’t usually go full-on with fake tanning, but when I’m feeling particularly pale, I’ll mix a few drops of Isle of Paradise Body Self-Tanning Drops into my body lotion. This gives me a little warmth without the mess of foam tanners. I love that I can just rub it in and go, plus it’s a cleaner option compared to traditional self-tanning products.
Step 2: Creating the Perfect Base
Once I’m bronzed up, I focus on my face. I love using Emmy Diane Tinted Mineral Sunscreen because it evens out my complexion while giving me some sun protection, and it’s lightweight. It’s perfect for a base. Since I like to add a little glow, I also mix in a bit of Supergoop Glow Screen for that radiant, dewy finish.
Step 3: Bronzing Up
Now comes the fun part—adding that bronzed glow! I use Drunk Elephant Bronzing Drops to give my skin an extra pop of warmth. I mix a drop or two into my foundation to make sure the color blends seamlessly with my skin. I use a damp beauty blender to apply this all over my face, making sure to get under my chin for an even look.
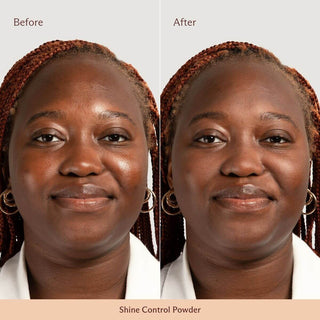
Step 4: Conceal and Set
To keep everything looking fresh, I like to use a darker concealer shade (015C) to create a soft contour along my cheeks, nose, and chin. I tap it lightly to blend, and then set everything with a shine control powder. It’s important to set everything, especially if you have acne-prone skin like me. This helps keep the makeup in place and prevents it from sliding off throughout the day.
Step 5: Sculpting the Face
For contouring, I always apply bronzer a little higher on my cheekbones, not too low on the jawline. This helps give my face a lifted look. After blending, I make sure to smooth everything out with my beauty blender for a flawless finish. A little bronzer on the jawline and nose adds warmth and depth to complete the look.
Step 6: Add a Natural Flush
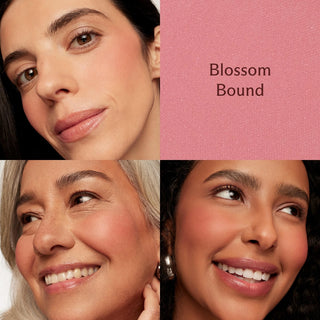
Next up is blush! I’m all about that springy, pinky vibe, so I love using Subtl’s Lip and Cheek tint in Mauve in the Maldives for a soft, natural flush. I dab it lightly onto my cheeks and then blend it out. The trick here is to tap instead of drag, especially when using your fingers, to avoid moving around the foundation underneath. I also follow up with Subtl’s Apricot Avenue and Blossom Bound powder blushes for even more glow and dimension.
Step 7: Eyeshadow and Shimmer
I love a good shimmer, so for my eyes, I start with Cloud Nine eyeshadow, which is a lovely peachy shade that blends into my skin tone. I apply it all over my lids to create a smooth base, and I use my fingers to apply a little shimmer to the center of my eyelids for some extra glow. It’s crazy how such a subtle shade can make such a big difference!
Next, I apply Apricot Avenue to my lower lash line and outer corners to add some depth. I also use a little bronzer in the crease of my eyelids to finish it off and give my eyes more definition.
Step 8: Brows and Lips
To frame my face, I fill in my brows with Subtl’s 3-in-1 Brow Brow BFF in Medium Brown and set them with the brow gel. I love how the gel holds my brows in place without making them feel crunchy. For my lips, I opt for Mauve in the Maldives, which is a beautiful shade, and I top it off with a bit of Guava Getaway lip liner for a soft, natural finish.
Step 9: Set Everything in Place
I finish off the look by adding a little more shine control powder to keep everything in place and help my makeup last longer. This is key to making sure I don’t get too shiny throughout the day, especially with all the glow we’ve added.
Step 10: Mascara to Complete the Look
Finally, I add a few coats of mascara to complete the look. It really ties everything together and opens up my eyes, making them pop.
Final Thoughts
And there you have it! This makeup routine is my go-to when I want to fake that sun-kissed glow without actually tanning my face. By using a combination of self-tanning drops, bronzing products, and clever contouring techniques, I can create a natural, glowing look that still feels like me. The key is to keep everything blended and build up the color slowly, so it looks seamless and natural.
You don’t have to change the color of your skin to look bronzed and radiant—it’s all about using the right products and techniques to fake that sun-kissed glow! I hope you guys love this tutorial, and feel free to drop any comments or suggestions below. Let me know if there are any other looks or techniques you want me to try out with Subtl products. Can’t wait to hear from you!
Thanks for watching, and I’ll see you next time!