How to Fake a Natural Tan with Makeup
A simple, sun-kissed routine you can do in five minutes
Spring has officially arrived, which means many of us are stepping outside and showing a little more skin after months of winter layers. The problem? Not everyone tans naturally.
Some of us burn. Then peel. Then go right back to square one. (It's me. I'm some of us.)
Self-tanner can help, but it requires planning. And if you forget to apply it the night before, you’re stuck waiting for the next opportunity.
The good news is that you can create a natural, believable tan using makeup. It takes about five minutes, washes off at the end of the day, and requires just a few strategic products.
Below is the technique we recommend for achieving that effortless sun-kissed glow.
Step 1: Hydrate Your Skin First
Before applying any bronzer, start with well-hydrated skin. This is one of the most overlooked steps and one of the biggest reasons bronzer can look muddy or uneven.
A lightweight moisturizer helps your makeup blend more smoothly and sit naturally on the skin.
For an extra glow, try using a moisturizer with a subtle shimmer. This creates a soft luminous base that enhances the bronzed effect and helps makeup blend seamlessly.
Step 2: Apply Your Normal Base
Next, apply your usual base makeup.
Most people don’t need a darker foundation to achieve a bronzed look. In fact, using your regular foundation or concealer shade often looks more natural.
Apply your base as usual and blend it down into your neck. This step is especially important because the bronzer will also be blended into the neck later to create a seamless transition.
At this stage, your skin should look even, hydrated, and ready for color.
Step 3: Use Cream Bronzer Where the Sun Hits
The most important step in faking a tan is placing bronzer where the sun would naturally hit your face.
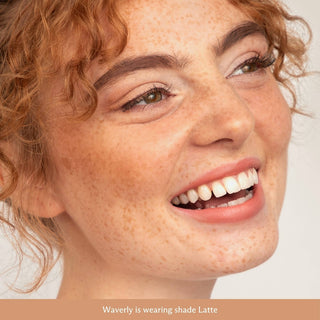
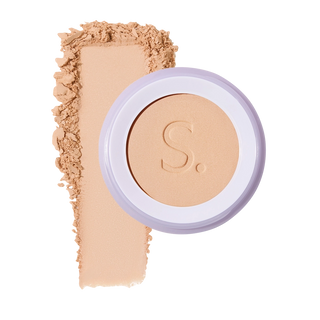
For the most natural result, start with a cream bronzer, like SUBTL’s Bronzing Balm. Cream formulas blend easily into the skin and create a soft, realistic warmth.
Instead of applying the bronzer directly to your face, first place a small amount on the back of your hand. This helps control the amount of product and prevents over-application.
Then gently press the bronzer into areas that typically catch sunlight:
- The tops of the cheekbones
- The outer forehead and hairline
- The bridge and tip of the nose
- The sides of the neck
Avoid applying bronzer under the cheekbones like a contour. The goal here is sun-kissed warmth, not sculpted definition.
Blend the bronzer upward into the hairline and lightly down the sides of the neck for a natural transition.
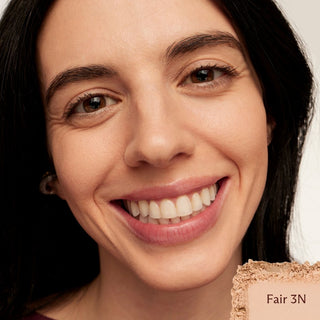
Choosing the Right Bronzer Shade
Many people assume that a darker bronzer will create a deeper tan. In reality, this can make the skin look muddy or overly orange.
A lighter bronzer shade usually creates the most natural result because it mimics how real sun exposure gradually warms the skin.
The key is to build color slowly rather than applying too much at once.
Step 4: Add a Touch of Sun-Kissed Color
Once the bronzer is blended, add a small amount of blush to enhance the sun-kissed effect.
A Lip & Cheek shade like Runway to Rose works beautifully because it contains natural red tones that mimic the subtle flush skin gets after being in the sun.
Lightly tap the blush:
- On top of the bronzer on the cheeks
- Across the center of the forehead
- Along the bridge of the nose
This creates the effect of a soft, natural sun exposure without looking overly red.
If the blush becomes too strong, simply blend a small amount of foundation or concealer down the bridge of the nose to soften the color.
Step 5: Lock It In with Powder Bronzer
To make the bronzed look last all day, use the “sandwich method.”
This technique layers powder bronzer on top of cream bronzer to set the color in place.
Using a fluffy brush, lightly sweep powder bronzer over the same areas where the cream bronzer was applied. This step adds depth while preventing the makeup from shifting, especially in warmer weather.
It’s particularly helpful during spring and summer when heat and humidity can break down cream products.
Step 6: Use Bronzer as Quick Eyeshadow
For a cohesive look, lightly sweep the same powder bronzer onto your eyelids.
This creates a soft wash of color that ties the entire face together without needing a full eyeshadow routine.
If the edges look too strong, soften them with a neutral powder like shine control powder.
Step 7: Blend Everything with BB Powder
A finishing layer of BB Powder helps blur and smooth the makeup while keeping the look natural.
Unlike traditional powder foundations that can feel heavy or cakey, BB Powder provides light coverage while blending all the layers together.
Apply it lightly around the edges of the face and anywhere you want to soften harsh lines.
This step helps create the airbrushed, natural finish that makes the tan look believable.
Finish the Look
To complete the routine:
- Apply a light coat of mascara
- Add a touch of lip + cheek color to the lips
In just a few minutes, you’ll have a warm, sun-kissed look that mimics a natural tan without sun damage or self-tanner.
A Five-Minute Tan, No Commitment Required
The beauty of creating a tan with makeup is the flexibility. You can adjust the depth, skip the sun exposure, and wash it all off at the end of the day.
For SUBTL users, this entire routine can fit neatly inside a customizable makeup Stak, keeping everything you need in one compact system.
Whether you already have a stack or you’re exploring a simplified makeup routine, this technique is one of the easiest ways to add warmth and glow to your look.
Happy stacking. ☀️